Mentioned in an earlier post in Chinese, I have been working on my talk lately. Finally, I think I am done with the pre-recorded part. It’s really tiring. Here I give a brief overview of the technique of using PowerPoint during my preparation. By the way, it turns out that I don’t actually want to have an animation-separated version, so I did not use PPspliT. By ‘another the’ way, some of my techniques are in fact incompatible with PPspliT, unless I do more work to fix my tricks. By ‘a third’ way, though I tagged this entry with ‘Programming’, there is no source code here.
Navigation:
Before I start, let me give some general techniques: Create a design time Slide Master that includes paddings and reserved areas, and follow it. Avoid resizing or moving placeholders. Use Size and Position pane to size and position objects for a long series of animation. Prefer simpler mechanisms when implementing something.
Hinting Morph transition
Bonus first! You can actually force a matching between objects for Morph transition. According to the documentation, objects with the same names that start with !! will be matched. This renders my techniques of matching lines/connectors and unmatching formulae not as useful, and you might want to jump to duplication and word splitting.
Matching lines/arrows/connectors
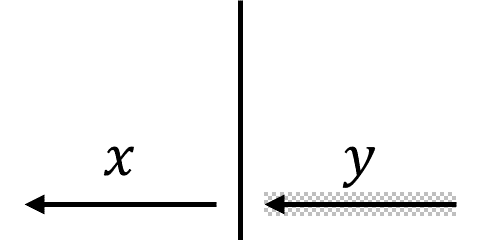
On slide 1, I have a black arrow and a text box with black x in it. On slide 2, I have a red arrow and a text box with red x in it, and they are at different positions than on slide 1. I want to use Morph transition to move the two objects and change their colors. However, PowerPoint Morph doesn’t seem to match arrows of different colors.
Except if they are connected to matched objects. The lines that can ‘snap’ to objects are collectively known as ‘connectors’ in PowerPoint. Suppose there are also two rectangles of the same style on slides 1 and 2. If you connect both arrows to the matching connection points of the two rectangles, these arrows are matched and will morph. Therefore, we can create transparent rectangles to help PowerPoint match the arrows. In the GIF, the rectangle is transparent per convention.
Note that this technique is not necessary as of now, because we can use Morph naming convention to match the arrows. However, it can still be useful when you want to specify how to match the two ends of a connector—connect them to two sets of matched objects. The two sets of matched objects can themselves be matched using the naming convention.
Unmatching formulae
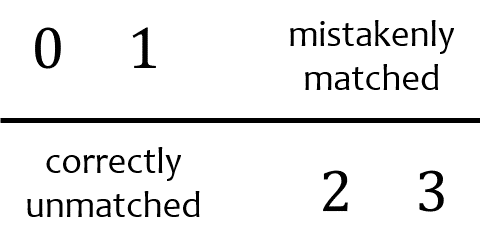
On slide 1, there is black 1 and 0. On slide 2, the black 1 changes to red 0, and the black 0 changes to red 1. If you use Morph, PowerPoint will match the black 1 with the red 1. What if this is not the intended effect?
Note that in this simple case, you might as well just use Fade. But you should really think of there being many moving parts, and you just want to unmatch the two formulae. This is the opposite of the previous problem.
The solution is to make the red 1 not actually a ‘1’. Type \vphantomSpace(1)Space into the formula, which will give a vertical phantom of ‘1’. Since we already have a ‘1’, this phantom won’t affect the typesetting result. However, its very existence makes it different from a simple ‘1’, and PowerPoint will not match the two formulae.
Note that this technique is not necessary as of now, because we can use Morph naming convention to unmatch text boxes.
Duplication
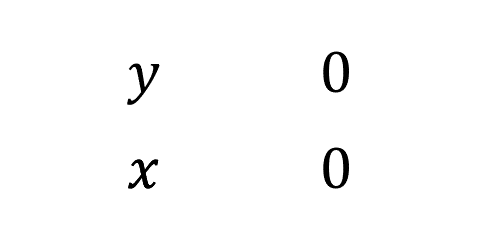
Suppose we want to create an animation like in the example, where the formula x is duplicated. (Note that for this effect, you need to unmatch 0’s and 1’s.) This can be done by decomposing the formula. On slide 1, put two overlapping x’s. On slide 2, move one x and the y to appropriate positions, as if they are typeset as one formula.
It’s not a real duplication, since things already exist. Note that this trick ruins semantics and accessibility. It’s also easy to fix. First, make your slides normally. Next, duplicate slides 1 and 2 for Morph transition between them, so the slides are 1, 1', 2', 2, where prime denotes copy. Then, duplicate or decompose objects on slides 1' and 2' to make them look like 1 and 2, but are good for Morph transition. Last, set 1' and 2' to advance after 0 seconds, and use Morph on slide 2'.
However, this fix ruins the slide numbers, so you’ll need the slide number fix.
Word splitting
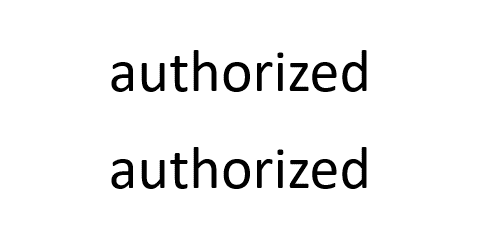
On slide 1, I have a word ‘authorized’. On slide 2, it becomes ‘unauthorized’. I want to use Morph and let the ‘un-’ be inserted, but even if I use ‘by Words’ transition option, since ‘un-’ itself isn’t a word, I don’t get the desired effect.
The trick is to use zero-width space (ZWSP), unicode character 8203 (decimal).
I usually use [char]8203|scb in PowerShell to set the clipboard to the ZWSP character.
Once a ZWSP is inserted between ‘un-’ and ‘authorized’, they are recognised as two words.
Of course, you might want to avoid doing so because of accessibility.
This can again be fixed using animation-dedicated slides and fixing the slide numbers.
Fixing slide numbers
If you have used slide transitions for animation (usually because you want to output good PDF) but wish to make the slides for animation have identical slide numbers, you need your own script for computing and writing slide numbers.
I used a VBA/PowerShell script for this when I prepared my Eurocrypt 2020 talk. Basically, it looks for slides whose first line of Notes is !number-1. If this happens, the script knows that the slide should have identical slide number as the previous one. When it finds the logical slide number of each physical slide (as well as the total number of logical slides), it looks for the slide number placeholder on each slide, and write the formatted slide numbers to it. I used {slide number} / {total number of slides} as the format.
Rehearse Timings with Presenter View
I couldn’t believe that PowerPoint (for Windows) doesn’t support this! Even PowerPoint for macOS does.
The recommended format of Eurocrypt talk is either video of presentation with narration audio, or video of presentation with the presenter in a corner (picture in picture). I decided to have myself on the video, to make my face known to people. One method for creating such videos is to use screen-recording software, by displaying both real-time camera output and the presentation. Another method is to use online meeting software that supports recording such as Zoom, the latest favourite of the world due to COVID-19. However, in order to see the notes when I record, either I have to print the notes, or I need a second monitor. Neither option is good for me at this moment. To make it worse, those methods are just taking a roundabout route. You could simply have Rehearse Timings on your slides, then export a video. This produces videos with the best pictures (in case your screen resolution isn’t an integral multiple of the output size) and the best smoothness (in case frame skips are severe due to screen recording and PowerPoint playing animations). Therefore, to produce a picture-in-picture talk video, I can run Rehearse Timings and record myself during the talk. Once I get both my face video and the slides video, I can stitch them together to obtain the talk video.
However, on Windows, this does not solve the problem of notes, as you cannot use Presenter View with Rehearse Timings. Not only is there no way to start Rehearse Timings with Presenter View (even if you have a second monitor), the feature is simply disabled! If you start Rehearse Timings and click the ‘…’ button (‘More’ menu) at the end of the bottom-left corner strip of buttons, you will find ‘Show Presenter View’ in grey!
There is a ‘Record Presentation’ feature, which supports a custom-made view resembling Presenter View. (On macOS this feature uses Presenter View.) However, its Notes panel is very hard to use (very small, looks like a pop-up that can be light-dismissed though not). I just cannot understand why Microsoft software engineers would maul up a separate interface for recording. This provides inconsistent experience and is a waste of person-hour.
The only positive side of ‘Record Presentation’ view is that on Windows, it shows the notes on the top instead of bottom-right (as in Presenter View), which is good for recording. I had to be careful to not look too much down when using Presenter View for recording.
To use Rehearse Timings with Presenter View on Windows (as of April 2020), we need to maul up our scripts.
First, we capture SlideShowBegin and the other slide show events, and record the events, the timestamps, and the slide indices.
Next, we parse our records and find out the correct timing arguments.
Lastly, we set the timings to the slides.
If the first slide does not have a transition effect, there is no animation that automatically plays with/after a transition, the presentation only moves forward without jumping (or terminating an animation/transition), and the presentation continues to the last slide, then the event sequences should match the following context-free language with initial non-terminal PPTX:
 PPTX = SlideShowBegin SLIDE* SlideShowEnd
SLIDE = SlideShowNextSlide SlideShowNextClick STEP*
 STEP = SlideShowOnNext SlideShowNextBuild+ SlideShowNextClick
PowerPoint Rehearse Timings works by setting the appropriate slide advance times (in the user interface, it’s Transitions | Timing | Advance Slide | After) and the TIMING tag, which cannot be inspected using the user interface that comes with PowerPoint.
Contrary to the documentation, SlideShowNextSlide is fired immediately after the transition into a slide completes.
Therefore, the advance time of slide K can be computed as
Timestamp[SlideShowNextSlide with index K+1]
− Timestamp[SlideShowNextSlide with index K]
− Duration[Transition effect of slide K+1].
The TIMING tag stores the ‘clicks’ for animation as |duration1|duration2|...|durationN.
The first duration is the time (in seconds) elapsed since the SlideShowNextClick until the first SlideShowOnNext.
The other durations are the time (in seconds) elapsed between the SlideShowOnNext events.
Usually, the PrintSteps property of a slide should coincide with your number of durations (plus one). However, I encountered a counterexample, when there is only one animation (triggered by click) and it is an Exit animation.
As a bonus of this method, your already-set timings will work (e.g., some slides are used for animation thus automatically advance). If you record new Rehearse Timings, any already-set auto-advance will not take effect.
I would like to provide this software at some point. However, I am busy with other stuffs at the moment. Let’s see whether Microsoft implements this first, or I finally find some time to do this.
Please enable JavaScript to view the comments powered by Disqus.